Building a Custom Diorama for Your Diecast Models

Many collectors think building a diorama requires expensive professional tools or a degree in fine arts. It doesn't. Most people assume you need to buy high-end, pre-made scenery sets to make a 1:64 scale car look realistic, but that's a mistake. A great diorama is actually about scale, lighting, and texture—not the price tag of your materials. This guide breaks down how to construct a realistic environment for your diecast models using accessible, everyday items.
What Materials Do I Need to Start a Diecast Diorama?
You need a sturdy base, a variety of textures, and a way to secure your objects. Most beginners start with a simple foam board or a wooden tray to act as the foundation. If you're building a garage scene for your Hot Wheels, you'll want different materials for the floor than you would for a dirt track.
The foundation is the most important part. If your base is flimsy, your entire scene will look cheap. I usually suggest using high-density XPS foam (the pink or blue stuff from hardware stores) because it's easy to carve. You can use a hobby knife to etch "cracks" in the concrete or create a curb.
Here is a quick breakdown of common materials and their uses:
| Material | Best Use Case | Difficulty |
|---|---|---|
| XPS Foam | Creating roads, curbs, or building walls | Medium |
| Static Grass | Adding realistic turf or grassy areas | Easy |
| Acrylic Paint | Adding color and weathering effects | Easy |
| Fine Sand/Gravel | Easy | |
| Balsa Wood | Building small structures or fences | Medium |
Don't overlook the power of "junk." A discarded piece of a cardboard box can become a shipping crate for a scale-model warehouse. A bit of aluminum foil can look like a metal ramp. The more you look at your recycling bin, the more possibilities you'll find. (It's actually quite fun once you start seeing the world in 1:64 scale.)
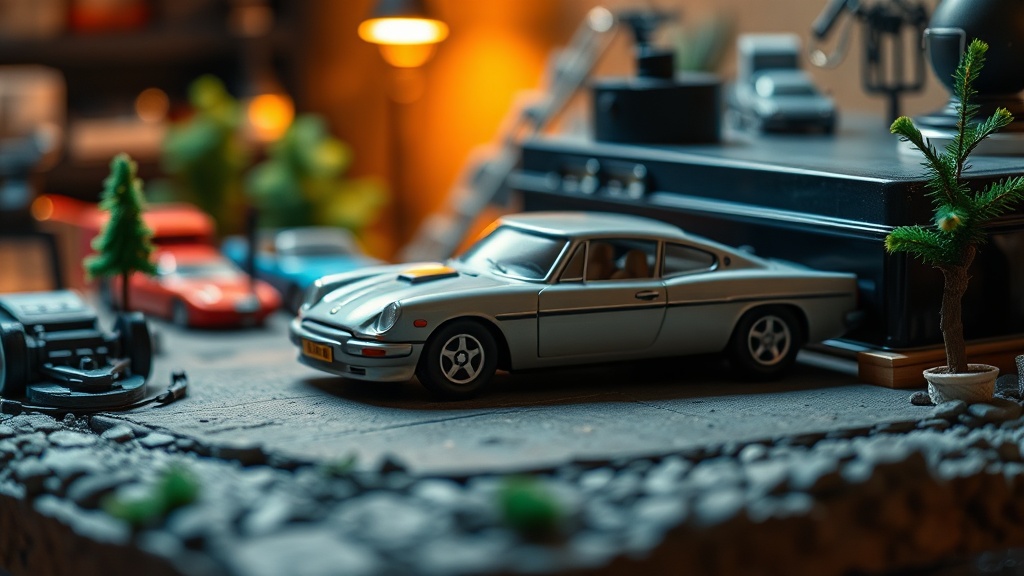
How Do I Make My Diorama Look Realistic?
Realism comes from imperfection and weathering. If your scene looks too clean, it looks like a toy; if it looks "lived-in," it looks like a photograph. A perfect, unblemied asphalt road looks fake. A road with a small oil stain or a tiny crack looks real.
One way to achieve this is through "weathering." This involves using paint and texture to simulate wear and tear. You can use a "dry brushing" technique—where you use a brush with very little paint on it—to catch the edges of your curbs or walls. This adds depth without making the scene look messy.
Lighting is another huge factor. If you're showcasing a high-end casting, like a specialized Hot Wheels casting, the light should hit it from an angle that highlights the body lines. Avoid harsh, direct light from the front. Instead, try using small LED strips or even tiny flashlights to create shadows. Shadows create drama.
Consider these three levels of detail:
- The Base Layer: This is your ground. Is it concrete, dirt, or grass? Ensure the texture matches the scale of the car.
- The Mid-Ground: These are your structures. A garage, a fence, or a roadside sign. These give the scene context.
- The Details: This is where the magic happens. Tiny oil spills, a discarded soda can, or even a tiny piece of gravel.
If you're building a scene for JDM models, you might want to focus on a street-style aesthetic. A slightly weathered curb and a bit of textured "asphalt" (dark grey sandpaper works wonders here) will make a Nissan Skyline look much more at home than a flat piece of black paper.
How Much Does It Cost to Build a Custom Diorama?
A custom diorama can cost anywhere from $10 to over $100 depending on whether you buy specialized hobby supplies or use household scraps. You can absolutely build a stunning scene for under $20 if you're willing to be resourceful.
If you go the "pro" route—buying specialized scale scenery from brands like Model Railroad suppliers—you'll spend more, but the results are often more consistent. For example, buying pre-made scale gravel or specialized "static grass" ensures the scale is perfect. However, for a beginner, I'd recommend starting small. Don't go out and buy a $50 set of miniature trees right away.
Here's a realistic budget breakdown for a medium-sized garage diorama:
- Low Budget ($10-$20): Cardboard, acrylic paints from a craft store, sand from your backyard, and hot glue.
- Mid Budget ($30-$60): XPS Foam, a basic set of hobby knives, sandpaper for road textures, and some basic LED lights.
- High Budget ($100+): High-quality resin for puddles, professional-grade weathering kits, and custom-built scale structures.
The cost of your time is also a factor. I've seen people spend weeks perfecting the texture of a single brick wall. While that's impressive, don't let the pursuit of perfection stop you from actually building. It's better to have a finished, slightly imperfect scene than a half-finished "perfect" one sitting in a drawer.
One thing to keep in mind: if you're building these for photography, the "look" matters more than the actual construction. A piece of black felt can look like a high-end showroom floor under the right light. You don't need to build a real-world scale garage to make a great photo.
Common Mistakes to Avoid
The biggest mistake is ignoring scale. If you put a 1:64 scale car next to a piece of "dirt" that is actually a large pebble from your garden, the illusion is broken instantly. The pebble will look like a giant boulder next to the car. Always check your proportions. If you're using sand, use very fine sand. If you're using gravel, make sure it's tiny.
Another mistake is using too much glue. Excess glue visible on the edges of a structure is a dead giveaway that it's a model. Use a toothpick for small amounts of glue or a precision applicator. If you're using a hot glue gun, be careful—it can leave thick, unsightly beads that are hard to hide.
Lastly, don't forget about the background. A common error is building a beautiful 3D-looking floor and then placing it in front of a blank white wall. This makes the diorama look like it's floating in space. Even a simple printed backdrop of a sky or a city skyline can provide the necessary depth to make your scene feel real.
If you're working on a highly detailed scene, you might want to document the process. It's easy to lose track of how much work you've put in. I often find it helpful to document my collection, and that includes the custom displays I build for them. It's good practice for both insurance and for your own personal archives.
Building dioramas is a skill that grows with every project. Start with a small 6x6 inch square. Master the texture of a single road or a single wall. Once you've nailed the scale for that small section, expanding to a larger scene becomes much easier. The goal isn't to build a museum; it's to build a home for your favorite cars.